Two options are available when accessing FEM/BDC Renew:
Copy Data Update: When the immobilizer information of the vehicle can be read
from the original FEM/BDC module, perform this function to read the information
and write it into the replacing FEM/BDC module.
Calculate Data Update: When the immobilizer information of the vehicle cannot
be read from the original FEM/BDC module, perform this function to generate
the information via the input VIN code, vehicle frequency and engine ISN code
and then write it into the replacing FEM/BDC module.
NOTE
Illustrations used in this manual are samples, and the actual testing screens may vary by
vehicle. Observe the menu titles and on-screen instructions to make correct selections
and operations.
FEM/BDC Renew via Copy Data Update
Preparation
1. Attention: If there’s an ELV in the vehicle, the ELV may not be unlocked after
performing FEM/BDC Renew. You’ll need to solve the locked problem yourself, so
please start the operation with careful consideration.
2. To perform the Copy Data Update function, a working key or the engine ISN code is
needed.
3. The hardware version of the original and replacing modules can only vary slightly.
Otherwise, the DTCs of the vehicle may not be cleared.
4. Remove the FEM/BDC module from the vehicle.
Removing the FEM/BDC Module
The FEM/BDC module is located at the A-pillar of the front passenger side.
Procedures to remove the FEM/BDC module from the vehicle:
1). Unclip the front door sill cover strip at the passenger side.
2). Remove the bottom right instrument trim panel and disconnect plug connections
behind it.
3). Remove the side trim panel at the passenger side.
4). Remove the cover at the lower part of the module.
5). Unlock the positive battery cable connector.
6). Disconnect the plug connections to the module.
7). Release the bolt from the module.
8). Remove the module from the vehicle.
5. Conduct ECU preprocessing on the replacing (used) module and the original module
to make them able to learn keys. No ECU preprocessing is needed for the replacing
module if it is a brand new one.
6. Prepare a blank key.
Procedures
1. Connect the OtoFlash to the original FEM/BDC module via the included main cable.
2. Connect the OtoFlash to the IM600 tablet via USB connection.
3. Turn on the IM600 tablet and tap OtoSys > IMMO. A vehicle menu displays and a
disclaimer prompts up. Tap Accept to continue
4. Tap BMW on the vehicle menu.
5. Tap ECU Renew > FEM/BDC Renew (CAN).
NOTE
1. You can click the icon near the top-right corner to record the operation data. If you
encounter any difficulties, click the icon again to send us the data and the problem,
so that our engineers could help. The network should be connected when uploading
the data.
2. Please make sure the engine is off before the operation gets started.
6. Tap Copy Data Update, read the notes and procedures listed in the operation guide
carefully, and then tap OK to continue.
NOTE
If you don’t strictly follow the steps, the data may be lost or the FEM/BDC Renew
operation may fail.
7. Tap Backup FAFP on the function menu to backup the FAFP data of the original
FEM/BDC module. Read the function information and tap OK to continue.
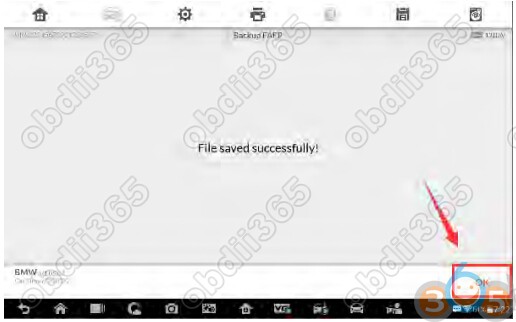
8. Tap OK > Confirm to save the data. When a “File saved successfully!” message
displays, tap OK and exit to the function menu.
NOTE
1. The data file can be renamed.
2. Memorize or note down the name and location of the file for later use.
9. Tap Read immobilizer data to backup the immobilizer data of the original module.
Read the function information and tap OK to continue.
10. When a “Do you have a working key?” message displays, make selection
accordingly. Tap Yes and then put the working key close to the emergency start coil
to read the password information, or tap No and move on to read the immobilizer
data.
NOTE
If the working key is verified in this step, it can be directly used to start the engine when
the FEM/BDC Renew is completed.
11. When the immobilizer data is read successfully, tap Save > Confirm to save the
data. When a “File saved successfully!” message displays, tap OK > Close and exit
to the function menu.
NOTE
1. The data file can be renamed.
2. Memorize or note down the name and location of the file for later use.
12. When Read Immobilizer Data is completed, connect the OtoFlash with the replacing
module via the included main cable.
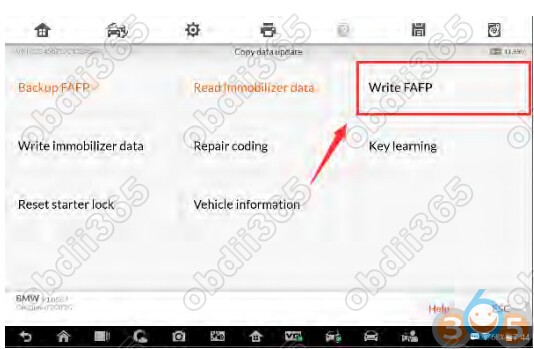
13. Then tap Write FAFP to write the saved FAFP data into the replacing FEM/BDC
module. Read the function information and tap OK to continue.
14. Select the saved FAFP data file and tap Confirm to complete Write FAFP. Then tap
OK and exit to the function menu.
15. Tap Write immobilizer data to write the saved immobilizer data into the replacing
module.
16. When a module menu displays, make selection accordingly.
NOTE
New Module: Perform this function if the replacing module is a brand new one.
Used Module: Perform this function if the replacing module is a used one.
17. Select the saved immobilizer data file and tap Confirm to continue.
18. Tap Write data to ECU. When Write Data to ECU is completed successfully, tap
Close and exit to the function menu.
19. Tap Repair coding to repair the coding of the new FEM/BDC module. Read the
function information and tap OK to continue.
20. Tap Yes to continue the coding operation. When Repair Coding is completed
successfully, tap OK and exit to the function menu.
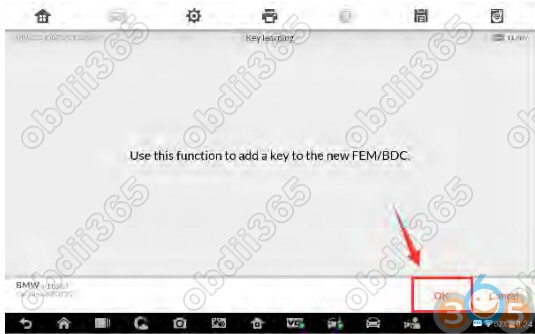
21. Tap Key learning to add a key to the new FEM/BDC module. Read the function
information and tap OK to continue.
NOTE
1. The password must be read out before the key can be written or cleared.
2. A key position must be selected before the key can be written or cleared.
22. Tap Read password to read the password information of the key.
23. When a “Do you have a working key?” message displays, make selection
accordingly. Tap Yes and then put the original key close to the emergency start coil
to read the password information, or tap No to input the engine ISN code.
24. Select a FREE key position and then tap Write key.
25. Follow the instruction to put the NEW key close to the emergency start coil and tap
OK to start Key Learning.
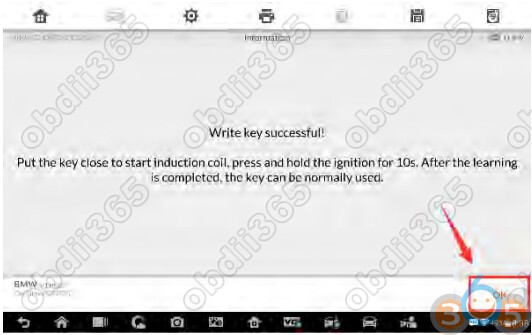
26. When a “Write Key successful!” message displays, tap OK to check the key ID status.
Then tap Close to exit to the function menu.
27. Tap Reset starter lock to reset the starter lock of the new FEM/BDC module. Read
the function information and tap OK to continue. When this function is done
successfully, Copy Data Update is completed.
28. Install the replacing FEM/BDC module into the vehicle and check if the engine can
be started.
NOTE
1. DTCs may be detected and specific machines are needed for programming, coding
and clear DTC.
2. If the remote function of the original working key doesn’t work after the operation,
please disable the key first and then enable it via Expert Mode > FEM/BDC > Key
enabled/disabled.
3. The newly added keys can be erased if you don’t need them.
FEM/BDC Renew via Calculate Data Update
Preparation
1. Attention: If there’s an ELV in the vehicle, the ELV may not be unlocked after
performing FEM/BDC Renew. You’ll need to solve the locked problem yourself, so
please start the operation with careful consideration.
2. Attention: All original keys won’t be accepted when performing the Calculate Data
Update function.
3. To perform the Calculate Data Update function, the VIN code, vehicle frequency and
engine ISN code are needed. This information can be obtained via Expert mode.
4. The hardware version of the replacing module can only vary slightly from that of the
original module. If two versions vary considerably, the DTCs of the vehicle may not
be cleared.
5. Remove the FEM/BDC module from the vehicle.
6. Conduct ECU preprocessing on the replacing (used) module and the original module
to make them able to learn keys. No ECU preprocessing is needed for the replacing
module if it is a brand new one.
7. Prepare two blank keys.
Procedures
1. Connect the OtoFlash to the replacing FEM/BDC module via the included main cable.
2. Connect the OtoFlash to the IM600 tablet via USB connection.
3. Turn on the Auro OtoSys IM600 tablet and tap OtoSys > IMMO. A vehicle menu displays and a
disclaimer prompts up. Tap Accept to continue.
4. Tap BMW on the vehicle menu.
5. Tap ECU Renew > FEM/BDC Renew (CAN).
NOTE
1. You can click the icon near the top-right corner to record the operation data. If you
encounter any difficulties, click the icon again to send us the data and the problem,
so that our engineers could help. The network should be connected when uploading
the data.
2. Please make sure the engine is off before the operation gets started.
6. Tap Calculate Data Update, read the notes and procedures listed in the operation
guide carefully, and then tap OK to continue.
NOTE
If you don’t strictly follow the steps, the data may be lost or the FEM/BDC Renew
operation may fail.
7. Tap Write Immobilizer data on the function menu to generate the immobilizer
information and write it into the replacing FEM/BDC module. Read the function
information and tap OK to continue.
8. When a module menu displays, make selections accordingly.
NOTE
New Module: Perform this function if the replacing module is a brand new one.
Used Module: Perform this function if the replacing module is a used one.
9. Input the VIN code, vehicle frequency and engine ISN code. Then tap OK to continue.
10. When a “Write data to ECU success!” message displays, tap OK and exit to the
function menu.
11. Tap Repair coding on the function menu to repair coding of the replacing FEM/BDC
module. Read the function information and tap OK to continue.
12. Tap Yes to continue the coding operation. When Repair Coding is completed
successfully, tap OK and exit to the function menu.
13. Tap Key Learning to add keys to the replacing FEM/BDC module. Read the function
information and tap OK to continue.
NOTE
1. The password must be read out before the key can be written or cleared.
2. A key position must be selected before the key can be written or cleared.
14. Tap Read password to read the password information of the key.
15. When a “Do you have a working key?” message displays, tap No and then input the
engine ISN code to read the password information.
NOTE
All original keys can no longer be accepted.
16. Select a FREE key position and then tap Write key.
17. Follow the instruction to put the NEW key close to the emergency start coil and tap
OK to start Key Learning.
18. When a “Write Key successful!” message displays, tap OK to continue
19. Repeat step 16-18 to learn the next key.
20. Check if two keys are successfully learned. Then tap Close to exit to the function
menu.
21. Tap Reset starter lock to reset the starter lock of the replacing FEM/BDC module.
Read the function information and tap OK to continue. When this function is done
successfully, Copy Data Update is completed.
Read the function information and tap OK to continue. When this function is done
successfully, Copy Data Update is completed.
22. Install the replacing FEM/BDC module into the vehicle and check if the engine can
be started.
NOTE
DTCs may be detected and specific machines are needed to modify vehicle information,
such as FAFP and integration level, and then to perform programming, coding and clear
DTC.


No comments:
Post a Comment